Halloween is drawing near. Apart from baking lots of halloween treats, I also bought a pumpkin and decided to make Pumpkin soup. It was lovely and warming especially on a cold snowy night like yesterday! I then decided to carve out some shapes! My dad always used to make me and my sister a pumpkin on halloween to take trick or treating. I used to love it. He would make us a pumpkin and then we'd dress up in a mask, wiches hat and a bin liner! Oh, the good old years of the 80's :)
Happy Halloween x
Wednesday, 29 October 2008
Saturday, 25 October 2008
Bites of spooky chocolate cake
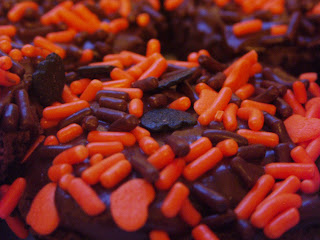
I made these for Halloween - little chocolate fairy cakes covered in chocolate icing and then topped with Halloween sprinkles! If you look very closely at the sprinkles you will see little bats and little pumpkins! They are hard to make out but I love the contrast of the orange and black together. Very cool for a dark spooky night!
I made the cakes using the following ingrediants:
85g/3oz self-raising flour
4 tbsp of cocoa powder
110g/4oz caster sugar
110g/4oz margarine
2 medium free range eggs
1 tsp baking powder
2 tsp milk
Preheat the oven to 170C/325F/gas mark 3 and line a muffin tray with cupcake cases/papers.
I followed this recipe from a new book my lovely sister bought me, I might write a quick book review on it soon, but basically rather than following the usual method of creaming the margarine and sugar together, it said to just put all the ingrediants, all of them, into a bowl and mix away! So easy, so I did just that. Everything went into the mixing bowl all at once (no folding in the flour in this recipe!) and mix until light and fluffly - then place tablespoons into the cupcake papers, into the over, bake for 20 minutes and leave to cool!
It was so simple and easy. Just like that they were done! My only criticism was that the cupcake papers don't stick to the cakes very well. I solved this problem by removing all the papers and serving them as little mini cakes. Once cooled, I covered them in chocolate icing and dipped them in sprinkles. Perfect for halloween, right then, I'm off to carve my pumkin next...
Fairy cakes with buttercream icing
In celebration of World Arthritis Day I made some fairy cakes to take to work. I work at Arthritis Care, a charity that supports and cares for people with arthritis. Every year World Arthritis Day, which falls on the 12th October, helps to raise awareness of the pain and suffering people living with arthritis can face. This year's theme was 'Think Positive'.
I made these fairy cakes and then decided to make buttercream following the recipe in the post below. I used all the tips I learnt in my baking class and piped the writing with a number 1 nozzle. Pink is the clour of Arthritis Care and everyone at work loved them! One thing I did learn from baking these was that sugarpaste does not fare well on buttercream - in fact it goes rather wet and soggy. (I used sugarpaste for the large 'AC' lettters) The next morning I had to take them off and pipe the letters instead!
I will be back soon with baking treats for Halloween, as the spooky day is drawing closer...
Sunday, 12 October 2008
Buttercream
I am now in my third week of the cake decoration course I have been attending. I feel like I'm learning lots and picking up good tips which I thought I would share with you. Every week we cover a different cake covering and last week was buttercream. Buttercream is a really simple and fast way to cover a cake and it tastes delicious. It is also great for piping with.
To make buttercream you will need:
125g/4oz unsalted butter, softened
250g/9oz icing sugar, sifted
2 teaspoons of boiling water
Flavourings and colourings can then be added as and when you wish. Here are some ideas for different flavours:
Citrus - beat in 2 teaspoons of finely grated lemon, orange or even lime rind and/or juice.
Coffee - dissolve 4 teaspoons instant coffee with 2 teaspoons of boiling water and then beat it in with the buttercream
Almond - beat 1 teaspoon of almond essence into the buttercream
Method:
Beat the butter for about 3 minutes using an electric whisk. You really need to beat it until it looks really light and fluffy and has paled in colour. This helps to take away the strong butter taste.
Add the icing sugar to the bowl, sifting it as you go along. A great tip is to place a tea towel over the top of the bowl and sieve to help eliminate being covered in an icing sugar dust cloud. Gently incorporate the icing sugar with the butter using a wooden spoon, and then whisk it well. If it is too stiff add the boiling water to the mixture. Then colour and flavour as desired.
Tips and Hints:
1. Always use unsalted butter. Unsalted butter keeps its shape better than regular butter. This is especially important when doing piping work as you do not want your design to melt away!
2. If you leave the buttercream to sit for a while always make sure you give it a good beat with a spoon before using, otherwise you will incorporate air bubbles into the mixture.
3. If your cake is a little crumbly then it is a good idea to cover it with jam first before adding the buttercream.
4. You should apply buttercream using a palette knife and apply it in thin layers. Add the first layer and then place it in the fridge for about 15mins, take it out and apply a second thin layer, place it in the fridge for another 15mins and then apply a third thin coat. It should now look quite smooth.
5. If you are struggling to achieve a smooth finish, then dip your plaette knife into hot water and dry it quickly. Smooth your cake with the hot knife and it should help.
6. You could always use a fork or knife balde to add some texture.
Saturday, 4 October 2008
Afternoon tea at Claridges
Last weekend I was lucky enough to go for afternoon tea at Claridges. It was an amazing experience and I will never forget it. I have never seen such a beautiful classical hotel so full of style and elegance. The decor and style have been so beautifully created and I loved imagining what it use to be like in the past when high society took afternoon tea everyday!
If you know me, you would know how much I love drinking tea and eating cake and so having the chance to have afternoon tea in such a beautiful setting was like a dream come true. It really was fantastic. We drank champagne and dined on sandwiches, scones and cakes. The sandwiches were just how I imagined with the crusts cut off and elegantly layed on a long plate. The scones came with cream and jam which I happily dolloped lots more on after every bite. And the cakes, well you can see from the picture above - they were out of this world. I wouldn't even know where to start in creating something so chic and exquiste as these! And finally, I have to mention the tea! Sipping claridges own blend black tea from a china teacup was just heaven. It tasted perfect and the whole evening was like a fairytale.
Subscribe to:
Posts (Atom)