I can't believe it's nearly Christmas already! Time has gone so quick. I've been busy baking every weekend nearly but I have found time to watch all the Christmas cooking programmes on TV! I loved 'Nigella's Christmas' especially! Today I have been busy finishing my third Christmas cake, baking ginger cookies and decorating them and making mini rum chocolate puddings!
The other day I had some time to make my first ever Mince Pies, they were delicious! I cheated a little and did it the 'express' way by using shop bought mincemeat but I did make my own pastry! They are so great to get out when people come and visit. Merry Christmas everyone, I hope you all have a fun and festive time!
Sunday, 21 December 2008
Wednesday, 17 December 2008
Christmas Cake - number two
Here is the second Christmas cake I have been working on for my two friends. It is another fruit cake covered in marizpan and then covered in black sugarcraft. Black is an unusual colour to choose for a Christmas cake but I thought it would look really effective with the white stars!
I cut out lots of little white sugarpaste stars and used a stamper to mark snowflakes. I dusted the snowflakes with shimmer dust and the effective was all shimmery and sparkly!
I also cut out larger stars and stuck them to the side of the cake.
I also added little silver balls to finish off! I love the stars and snowflakes and the contrast between the black and white. I hope my friends like it too!
Santa came early this year as for my birthday I was given the Nigella Chritmas book that I have been dying to get my hands on! I am so pleased - thanks Saff - I love it! :)
Sunday, 7 December 2008
Christmas Cake (Number one)
This is the first of the four Christmas cakes I am making this year. This was also my final piece for my baking class (I came third which I was pleased with!). It is a 6inch fruit cake, covered in marizpan and then covered in sugarpaste. I then decorated it with some of the techniques I have learnt over the past few weeks. Below is an example of crimping using a special crimping tool.
I cut this circle out (below) using a scone cutter and then used a patchwork snowflake cutter to create the snowflake pattern and brushed over it with shimmer dust. I then cut out lots of stars, brushed them with shimmer dust and stuck them on using royal icing.
I coloured some marizpan red and green and rolled it together. I then gently placed it around the bottom of the cake and then piped royal icing around the edges of the cake board.
So far I have made 3 out of the 4 cakes - 2 of them are waiting to be marizpaned and iced so watch this space for more christmas cake ideas. Anyone for a slice?
Wednesday, 3 December 2008
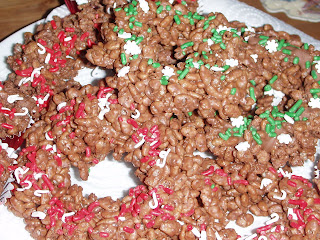
Chocolate Christmas Wreaths
I took this idea from the Nigella Christmas book (which I'm hoping get for Christmas from Santa!). In her book she uses cornflakes and a sugar coating I think but I used rice krispies and a chocolate coating! It was so easy to do, I just poured some rice krispies into a bowl, covered them with melted chocolate, placed large spoonfuls onto a piece of tin foil and then made a hole in the middle. To add some extra Christmas charm I sprinkled them with Christmas sprinkles!
I also filled mini cupcake papers with the chocolate rice krispie mixture and added some more sprinkles!
The sprinkles are snowflakes and candy canes - so sweet!
I also filled mini cupcake papers with the chocolate rice krispie mixture and added some more sprinkles!
The sprinkles are snowflakes and candy canes - so sweet!
Wednesday, 26 November 2008
Royal Icing
I wanted to do a quick post on royal icing before I commence with the Christmas baking! I love royal iced cakes but if your just starting out it may be easier to cover your cake with sugarpaste. Either way, both look and taste delightful!
I made this cake and iced it at my baking class, it has 4 layers of icing! I finished it off with some piping around the edges. Always make sure your cake is covered in marizpan before starting to cover it in royal icing!
To make royal icing you need:
2 egg whites
1ml lemon juice
500g icing sugar, sieved
5ml of glycerine
Make sure you have an extremely clean bowl. Place the egg whites and lemon juice into the bowl and use a clean wooden spoon to stir the egg whites and break them up so that they mix with the lemon juice. Add some of the icing sugar and use the wooden spoon to mix together. Keep adding more icing sugar and stiring until you get the consistency you want. I usually beat it until it looks smooth and glossy. Then stir in the glycerine. This helps to keep the icing soft once the cake has been cut. Always allow the icing to rest before using it, usually for about an hour and always make sure it is covered in a damp cloth when not using otherwise it will become dry. When you are ready to use it, give it another stir as this will help to dispearse any air bubbles that may have formed!
I will do another post after Christmas about the different consistencies and other points about royal icing such as piping, flavouring and colouring it. I hope this helps you cover your christmas cake! Let the Christmas baking begin...
Wednesday, 19 November 2008
Christmas Cake - part two
Okay, so the next you need to do is make sure your cake tin is covered properly. Using greaseproof paper draw a circle around the bottom of your tin and cut it out. Make sure it fits into the bottom of the tin easily. Cut a strip of paper the length of your tin and cut along the bottom little slits so that you can fold them to fit the inside of the tin perfectly. Place the circle in the bottom. I recommend that you also cover the outside of your tin with brown parcel paper and string but I didn't have any string at the time and had to make do without. I did however place 4 squares of the paper under the cake tin when I put it in the oven (as shown above). This is to make sure that the cake doesn't get overcooked underneath or on the sides as it is going to be in the oven for a long time!
Using another large bowl, place the remaining ingredients into it - sugar, flour, ground almonds, mixed spice, treacle, butter and eggs. Stir everything together until it is well mixed. You should use a wooden spoon to do this.
Beat everything together unitl it is well mixed, smooth and glossy. Next, add the mixed fruit and stir it into the mixture. Pour the mixture into the prepared tin and smooth the top with the back of a wet metal spoon. Give the tin a few sharp bangs to make sure the mixture has spread evenly in the bottom. Place it in the centre of the oven (pre-heated, of course to 140c/275f/gas mark 1) and cook for 2 - 2h 15mins. Use a prong to test to see if it is cooked. Allow it to cool in the tin and then turn it out but do not remove the brown paper as it will help to keep the cake moist. Wrap in it foil twice and store it in a cool dry place. Over the next few weeks you can sprinkle more brandy over it if required!
Next, I will upload ideas for icing and decoration. Watch this space!
Monday, 17 November 2008
Christmas Cake Part one
I love fruit cake. It has to be one of my favourite things, i like it even more when it's covered with a lovely soft layer of marizpan and then smeared in royal icing! Heaven. My mum makes the best fruit cakes - I love them - she even made all of my wedding cakes for me! (This was before the days of my obsession with baking began!)
So, no Christmas is complete without a centre-piece for the table, something to offer the guests when they come round to visit - a lovely slice of Christmas fruit cake that has been soaked in alcohol and then a little more drizzled over in the weeks before it gets iced and decorated! It is best to start early with fruit cake. Tonight, I thought I would start with the ingredients, tomorrow I will write up the method and then I will show some decorating ideas!
I only have a 6inch cake tin at the moment and so, this recipe is for a 6inch tin only. It is taken from 'The International school of sugarcraft' and it tastes divine!
You will need:
125g/4oz raisins
125g/4oz sultanas
125g/4oz currants
60g/2oz of dried chopped apricots
90g/3oz glace cherries
30g/1oz cut mixed peel
30g/1oz chopped nuts
5ml/1 teaspoon lemon juice
15ml/1 tablespoon of brandy,whisky,sherry
185g/6oz plain (all purpose) flour
5ml/1 teaspoon ground mixed spice
30g/1oz ground almonds
125g/4oz soft dark brown sugar
125g/4oz butter or margarine
7.5ml black treacle
2 medium eggs
The best thing to do is take a large bowl and add in all the weighed out dried fruits. Add the lemon rind juice and the alcohol (I used brandy and whiskey but you can add all three if you prefer), give everything a good stir and then cover and leave to sit overnight while the fruit soaks up all the juices! Yum!
Sunday, 16 November 2008
Sugarcraft exhibition
I have been a very busy girl recently, I always seem to be busy and often feel I do not have enough hours in the day to do everything I would like. Yesterday, however I did find time to travel to Birmingham and go to the NEC to visit the Cake decoration exhibition. My, my it was amazing! I had such a great time there and would recommend anyone who likes baking and cakes to go next year. There were lots of stalls selling everything from cake tins, to cookie cutters to modelling tools and sugarpaste. It was great - I had a mini shopping frenzy stocking up on all the tools I need for cake decoration! There was also a vast amount of cakes being entered into the annual competition and the standard was out of this world, I have never seen cakes so exquisitely created with such detail. Some of them must have taken hours! Many of the stalls also had people demonstrating, I learnt how to make some acorns out of flower paste, how to model with sugarpaste and how to use patchwork cutters. I came away totally inspired and excited!
I have made so many cakes over the past few weeks at my course! We've had cake coming out of our ears! Mrs B's Kitchen is about to get even busier with Christmas coming along so fast - I am ever so excited - in the run up to Christmas I will be making many Christmas bakes - starting this week with Christmas Cake - Christmas isn't Christmas without a centre piece of delicious fruit cake covered in marizpan and royal icing! In my opinion of course!
Monday, 3 November 2008
Sugar biscuits
I made these biscuits for Halloween and Bonfire night. We went to watch fireworks last night in London and they are very extragant and sparkly! In fact, sometimes they seemed to fill the whole sky, I love the ones that twinkle and sparkle in the sky and shoot across like shooting stars. My friend even brought along toffe apples (vegan style for our vegan friend).
Some of the exciting things I got up to on Halloween was baking these biscuits and taking them to work, participating in the pumpkin carving competition (I came second) and best of all, watching 'The Women in Black' at the threatre. It was so spooky, I must have jumped out of my seat a dozen times. The acting was amazing and I loved the story. I would recommend this play to anyone, it was great to watch it on Halloween!
I made these biscuits following the 'basic sugar cookie' recipe from Peggy Porschen's 'Pretty Party Cakes' book. I then covered them in a black icing glaze (though it looks more purple!) and covered them in coloured sugar or sprinkles - everyone at work loved them!
I also made cinder toffee - I could give you the recipe if you like but there are no pictures as most of it got stuck to the parchment paper! I missed the bit where it said to pour it onto greased foil - oh well - maybe next year! Happy Bonfire night! Don't forget to make lots of yummy parkin cake too!
Wednesday, 29 October 2008
Halloween - Scary Pumkin
Halloween is drawing near. Apart from baking lots of halloween treats, I also bought a pumpkin and decided to make Pumpkin soup. It was lovely and warming especially on a cold snowy night like yesterday! I then decided to carve out some shapes! My dad always used to make me and my sister a pumpkin on halloween to take trick or treating. I used to love it. He would make us a pumpkin and then we'd dress up in a mask, wiches hat and a bin liner! Oh, the good old years of the 80's :)
Happy Halloween x
Happy Halloween x
Saturday, 25 October 2008
Bites of spooky chocolate cake
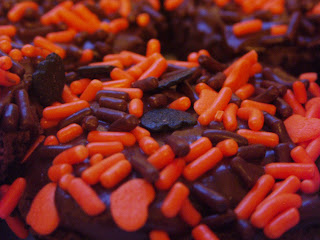
I made these for Halloween - little chocolate fairy cakes covered in chocolate icing and then topped with Halloween sprinkles! If you look very closely at the sprinkles you will see little bats and little pumpkins! They are hard to make out but I love the contrast of the orange and black together. Very cool for a dark spooky night!
I made the cakes using the following ingrediants:
85g/3oz self-raising flour
4 tbsp of cocoa powder
110g/4oz caster sugar
110g/4oz margarine
2 medium free range eggs
1 tsp baking powder
2 tsp milk
Preheat the oven to 170C/325F/gas mark 3 and line a muffin tray with cupcake cases/papers.
I followed this recipe from a new book my lovely sister bought me, I might write a quick book review on it soon, but basically rather than following the usual method of creaming the margarine and sugar together, it said to just put all the ingrediants, all of them, into a bowl and mix away! So easy, so I did just that. Everything went into the mixing bowl all at once (no folding in the flour in this recipe!) and mix until light and fluffly - then place tablespoons into the cupcake papers, into the over, bake for 20 minutes and leave to cool!
It was so simple and easy. Just like that they were done! My only criticism was that the cupcake papers don't stick to the cakes very well. I solved this problem by removing all the papers and serving them as little mini cakes. Once cooled, I covered them in chocolate icing and dipped them in sprinkles. Perfect for halloween, right then, I'm off to carve my pumkin next...
Fairy cakes with buttercream icing
In celebration of World Arthritis Day I made some fairy cakes to take to work. I work at Arthritis Care, a charity that supports and cares for people with arthritis. Every year World Arthritis Day, which falls on the 12th October, helps to raise awareness of the pain and suffering people living with arthritis can face. This year's theme was 'Think Positive'.
I made these fairy cakes and then decided to make buttercream following the recipe in the post below. I used all the tips I learnt in my baking class and piped the writing with a number 1 nozzle. Pink is the clour of Arthritis Care and everyone at work loved them! One thing I did learn from baking these was that sugarpaste does not fare well on buttercream - in fact it goes rather wet and soggy. (I used sugarpaste for the large 'AC' lettters) The next morning I had to take them off and pipe the letters instead!
I will be back soon with baking treats for Halloween, as the spooky day is drawing closer...
Sunday, 12 October 2008
Buttercream
I am now in my third week of the cake decoration course I have been attending. I feel like I'm learning lots and picking up good tips which I thought I would share with you. Every week we cover a different cake covering and last week was buttercream. Buttercream is a really simple and fast way to cover a cake and it tastes delicious. It is also great for piping with.
To make buttercream you will need:
125g/4oz unsalted butter, softened
250g/9oz icing sugar, sifted
2 teaspoons of boiling water
Flavourings and colourings can then be added as and when you wish. Here are some ideas for different flavours:
Citrus - beat in 2 teaspoons of finely grated lemon, orange or even lime rind and/or juice.
Coffee - dissolve 4 teaspoons instant coffee with 2 teaspoons of boiling water and then beat it in with the buttercream
Almond - beat 1 teaspoon of almond essence into the buttercream
Method:
Beat the butter for about 3 minutes using an electric whisk. You really need to beat it until it looks really light and fluffy and has paled in colour. This helps to take away the strong butter taste.
Add the icing sugar to the bowl, sifting it as you go along. A great tip is to place a tea towel over the top of the bowl and sieve to help eliminate being covered in an icing sugar dust cloud. Gently incorporate the icing sugar with the butter using a wooden spoon, and then whisk it well. If it is too stiff add the boiling water to the mixture. Then colour and flavour as desired.
Tips and Hints:
1. Always use unsalted butter. Unsalted butter keeps its shape better than regular butter. This is especially important when doing piping work as you do not want your design to melt away!
2. If you leave the buttercream to sit for a while always make sure you give it a good beat with a spoon before using, otherwise you will incorporate air bubbles into the mixture.
3. If your cake is a little crumbly then it is a good idea to cover it with jam first before adding the buttercream.
4. You should apply buttercream using a palette knife and apply it in thin layers. Add the first layer and then place it in the fridge for about 15mins, take it out and apply a second thin layer, place it in the fridge for another 15mins and then apply a third thin coat. It should now look quite smooth.
5. If you are struggling to achieve a smooth finish, then dip your plaette knife into hot water and dry it quickly. Smooth your cake with the hot knife and it should help.
6. You could always use a fork or knife balde to add some texture.
Saturday, 4 October 2008
Afternoon tea at Claridges
Last weekend I was lucky enough to go for afternoon tea at Claridges. It was an amazing experience and I will never forget it. I have never seen such a beautiful classical hotel so full of style and elegance. The decor and style have been so beautifully created and I loved imagining what it use to be like in the past when high society took afternoon tea everyday!
If you know me, you would know how much I love drinking tea and eating cake and so having the chance to have afternoon tea in such a beautiful setting was like a dream come true. It really was fantastic. We drank champagne and dined on sandwiches, scones and cakes. The sandwiches were just how I imagined with the crusts cut off and elegantly layed on a long plate. The scones came with cream and jam which I happily dolloped lots more on after every bite. And the cakes, well you can see from the picture above - they were out of this world. I wouldn't even know where to start in creating something so chic and exquiste as these! And finally, I have to mention the tea! Sipping claridges own blend black tea from a china teacup was just heaven. It tasted perfect and the whole evening was like a fairytale.
Friday, 26 September 2008
Oatcakes
I made my own oatcakes. They were so simple to make and taste delightful with cheese on. I was amazed at how simple they were to make; I am never going to buy another oatcake again they keep for ages in an airtight container and are such a good snack to munch on during the late afternoon.
All you need is:
225g/8oz oats (plus a few more for sprinkling)
75g/3oz plain flour
1.5ml bicarbonate soda
5ml/ 1tsp salt
25g/2tbsp lard
25g/2 tbsp butter
A little boiling water
Preheat the oven to 220c/425f/gas mark 7. Place the oatmeal, flour, bicarbonate of soda and salt into a large bowl and mix together. Melt the lard and the butter together in a small pan over a low heat. Once it has melted add it the dry ingrediants and use a little boiling water to make a dough. Sprinkle some more oats over your chopping board or work surface and roll out the dough thinly. Cut into circles and place on an ungreased baking tray for 15 minutes. Finished!
Tuesday, 9 September 2008
Blackberry crumble squares
Have you been watching the Hairy Bikers/Bakers on TV? Last night they created wedding cakes! It was a 4 part series and each week they baked something different. They covered bread, pies, cakes/bakes and celebration cakes! I really enjoyed it; they are so funny to watch!
Anyway, here is my latest bake - blackberry crumble squares! The actual recipe was called 'Blackcurrant Squares' but I didn't have any blackcurrants so made it with blackberries. I think it would work just as well with any kind of berries especially raspberries and blueberries! Yum.
You will need:
115g/4 oz butter, softened
175g/6 oz caster sugar
1 egg
280g/10 oz self-raising flour
125ml/4fl oz milk
200g blackberries
And for the crumble topping:
115g/4 oz caster sugar
85g/3 oz plain flour
finely grated rind of 1 lemon
50g/2 oz butter
Preheat the oven to 180c/gas mark 4. Butter an oblong cake tin or I think a square one would work just as well.
Beat together the sugar and butter in a bowl using an electric whisk until pale and fluffy. Whisk in the egg, then carefully fold in the flour and milk until all the mixture is combined. Spoon into the buttered tin and sprinkle the blackberries over the top.
To make the crumble, mix the sugar, flour and lemon rind together. Rub in the butter until the mixture feels crumbly and then sprinkle this onto of the blackberries.
Bake for 45 mins until the blackberries start bursting through the golden crumble. Once cool, cut into squares and serve. Be warned though, it needs eating fairly quickly as the crumble topping doesn't stay crumbly for long! This recipe was adapted from Goodfood magazine book!
Wednesday, 3 September 2008
Banana Muffins
I ran the Nike Human 10k Race last Sunday. It was amazing fun! A million people from 25 different countries took part all on the same day. The race in London started at Wembley Stadium and it poured down with rain! I couldn't believe it! I managed to run the whole 10k in 1h3:55 which I think was quite good considering the weather conditions. It felt so good at the end to have finished; everybody received a t-shirt saying 'Today I raced the world' which I thought was pretty cool! For weeks beforehand I was storing up on my carbs - pasta, bread and of course, the ultimate energy food - bananas! I thought making banana muffins would be a great idea. Bananas give slow releasing energy but sometimes I struggle to eat bananas especially ones that are going off so what better way then to bake them into muffins!
You will need:
200g (7oz) plain flour
3 tsp baking powder
1.5 tsp ground cinnamon
pinch of ground nutmeg
50g (2oz) ground almonds
50g (2oz) sugar
2-3 bananas
2 eggs
2 tbs vegetable oil
125ml (4 fl oz) milk
3 tablespoons of honey
They are extremely easy to make. First make sure your oven is preheated to 190c/375f/gas mark 5 and place the muffin cases into the tin. This recipe makes 10.
Mix the flour, baking powder and cinnamon in a bowl. Stir in the nutmeg, almonds and sugar.
Mash the bananas together using a fork and mix in the eggs, oil, milk and honey to make a sloppy paste. Add this to the dry ingrediants in the bowl and mix all together.
Spoon the mixture into the paper cases and bake in the oven for 20-25 minutes!
The perfect energy food! Delicious!
Wednesday, 20 August 2008
One year on...
Wow, today my blog is a year old! I can't believe i've now been baking and blogging for a whole year! And so to celebrate I thought I would post up the birthday cake I have just made! Happy one year Birthday to Mrs B's Baking! Anyone for some cake?
I feel that my baking has vastly improved since a year ago. I can't believe, when I look back at all the photos how many things I have actually baked in a year and how much of it we have eaten! It's been so much fun. There have been times when I have considered giving up blogging but then I'm always baking and messing around in the kitchen so I may as well post about it! Thank you to everyone who has read it and left me comments, it's so really sweet of you all.
One of my favourite moments and highlights of my blogging year was when Channel 4 mentioned it last Christmas on their website. They were talking about christmas baking in the blog world and mentioned my blog which I was amazed at! I told all my family and friends! hehe!
I love baking treats and things for people and everyone who comes to visit hubbie and I in London always arrives to freshly baked goodies of some kind! One of my favourite things is spending time pottering around the kitchen or reading baking books! One day I would love to set up my own little cake business from home making and designing wedding cakes - it would be a dream! Until then I can just enjoy pottering!
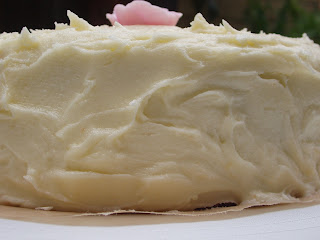
I wish I could send everyone who reads my blog a big slice of this cake! It is a madeira cake with home made black currant jam and then I covered it in swirls of buttercream and finished it with a sugar pink rose! Can I tempt anyone for a slice? Can I? Can I? :)
Thank you once again everyone for your kind comments and all the tips. I love reading all your blogs and comments and blogging wouldn't be half as much fun without you all! Here's to the next year... x x x
Subscribe to:
Posts (Atom)